Last updated: April 2026
Claude Code runs shell commands, edits files, and manages git repositories on your behalf. Running it inside a virtual machine gives you an isolation boundary: if something goes wrong, your host system is unaffected. You can also snapshot the VM and roll back at will.
UTM is a macOS application that provides a convenient frontend for QEMU virtual machines. The setup below creates a Linux VM with one or more shared folders, so you can edit files on your Mac (e.g., in Visual Studio Code) and have Claude Code work on them inside the VM. The examples use Ubuntu, but any Linux distribution will work with minor adjustments.
Download and install UTM, then download an Ubuntu desktop image (ARM64 if you are on Apple Silicon). (A server image works too, and takes up less space, but forces pre-SSH bringup to be done without cut-and-paste.) Create a new VM following the UTM basics guide.
Once the VM is running, install the QEMU guest agent (see UTM Linux guest support for background). On Ubuntu:
sudo apt install qemu-guest-agent
In UTM's VM settings, add a shared directory pointing to the folder on your Mac that contains the files you want Claude Code to work on. UTM exposes the shared directory to the guest via the VirtIO 9p protocol.
For concreteness, the rest of this guide uses /Users/username/src as the shared directory. (Replace username with your actual username throughout.)
Inside the guest VM, create a mount point:
sudo mkdir -p /mnt/utm1
Add the following line to /etc/fstab:
# UTM shared folder (VirtIO 9p)
share  /mnt/utm1  9p  trans=virtio,version=9p2000.L,rw,_netdev,nofail,auto  0 0
Then reload systemd and mount:
sudo systemctl daemon-reload
sudo mount /mnt/utm1
Verify that the mount works:
ls /mnt/utm1
You should see your Mac files listed.
On some Ubuntu versions (e.g., 25.04) you may see this error when reloading:
Failed to restart network-fs.target: Unit network-fs.target not found.
This is harmless — the _netdev and nofail options in the fstab entry mean that the mount will still succeed. If the mount did not happen automatically at boot, run:
sudo systemctl daemon-reexec
sudo mount /mnt/utm1
If you inspect the mounted files, you will notice that they are owned by UID 501 and GID 20 — the default macOS user and staff group. Your Linux user is typically UID 1000 / GID 1000, so the files appear to belong to someone else and you cannot modify them as yourself:
$ ls -na /mnt/utm1
drwxr-xr-x  501  20  4096  ...
The simplest fix is to renumber the guest user to UID 501 and GID 20, matching your Mac user. After the change you can use /mnt/utm1 directly — no remapping layer, files round-trip cleanly between guest and host, and a guest-side touch foo under umask 002 produces a file with mode 0664 owned by you on both sides.
The change is a one-time operation. Do it from a root shell on the console, with no username sessions logged in. The easiest moment is right after first boot, before any significant configuration has happened. If the VM is already in use, take a snapshot first.
On Debian/Ubuntu, GID 20 is held by the dialout group (serial port access). Move it to an unused high number first:
sudo groupmod -g 1020 dialout
Group membership is by name, so anyone in dialout keeps the same access — only the number moves.
sudo groupmod -g 20  username
sudo usermod  -u 501 username
This assumes your primary group is named after your user, as is standard on Ubuntu. Otherwise substitute the real group name. usermod automatically chowns files inside the home directory; files outside it must be fixed by hand:
sudo find /     -xdev -uid 1000 -exec chown 501 {} +
sudo find /     -xdev -gid 1000 -exec chgrp 20  {} +
sudo find /home -xdev -uid 1000 -exec chown 501 {} +
sudo find /home -xdev -gid 1000 -exec chgrp 20  {} +
The -xdev flag is essential: do not let find descend into /mnt/utm1, or you will rewrite the ownership of your Mac files through the 9p mount. The second pair of commands is only needed if /home is on a separate filesystem.
Verify nothing is left:
sudo find / -xdev \( -uid 1000 -o -gid 1000 \) -print
A few service-owned files may remain — Docker, Postgres, and snap packages tend to cache numeric IDs in their data directories. Fix those explicitly, or remove and reinstall the package after the UID change.
sudo reboot
# after login:
id
# expect: uid=501(username) gid=20(username) ...
touch /mnt/utm1/foo
ls -la /mnt/utm1/foo
# expect: -rw-rw-r-- 1 username username 0 ... foo
UTM's UI-configured share uses security_model=mapped-xattr, which always stores files on the macOS host with mode 0600 owned by your Mac user, regardless of what the guest writes; the guest's preferred mode and ownership are kept in extended attributes. The guest view is correct — a touch foo under umask 002 shows up as 0664 on the guest side — but on the host the same file is 0600, which is awkward if a Mac tool that does not honor those xattrs also touches the directory.
To make the host-side permissions match what the guest writes, add the share via raw QEMU arguments with security_model=none instead of using UTM's UI. UTM's UI does not expose the security model setting.
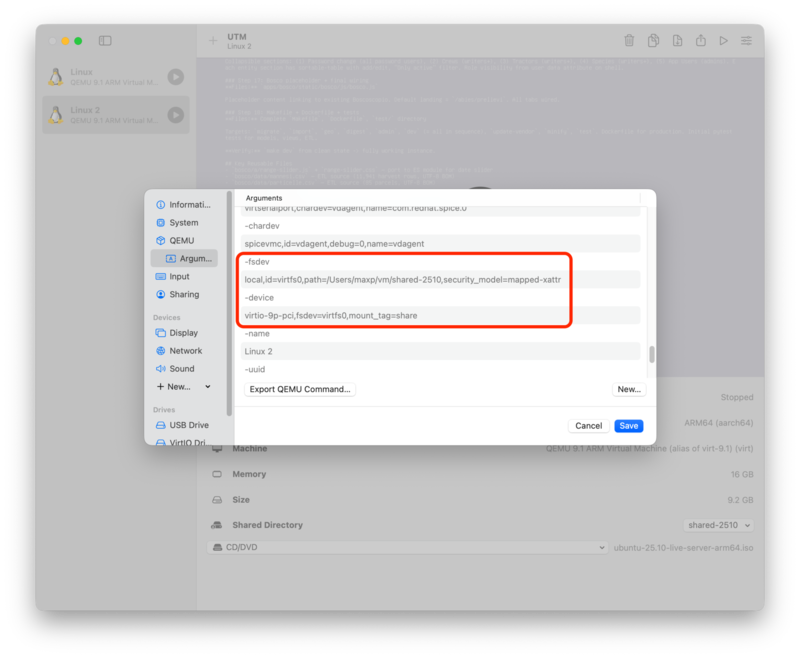
Clear the UI-configured shared directory, then open the QEMU > Arguments page in UTM and add four arguments:
-fsdev
local,id=virtfs0,path=/Users/username/src,security_model=none
-device
virtio-9p-pci,fsdev=virtfs0,mount_tag=share
The mount_tag=share matches the share source in the fstab line from section 2, so no guest-side change is needed. With this in place, touch foo under umask 002 produces a file with mode 0664 owned by 501:20 on both sides.
Trade-offs of security_model=none: chown calls from the guest are silently ignored (since the QEMU process is not privileged on the host), and every file ends up owned by your Mac user on the host regardless of which guest user created it. For a single-user development VM neither matters; in other scenarios mapped-xattr may be a better fit.
UTM is a sandboxed macOS application, and QEMU can only open host paths for which UTM holds a security-scoped bookmark. macOS issues these when you pick a folder with the "Browse..." button in the Shared Directory UI; paths that appear only in custom QEMU arguments have no bookmark, and the sandbox denies the open. The VM either refuses to start or starts with the share unreadable, often with an error like:
QEMU error: QEMU exited from an error:
... cannot initialize fsdev 'virtfs0':
failed to open '/Users/username/src': Operation not permitted.
The fix is to "prime" the bookmark by going through the UI once:
The bookmark can be invalidated by UTM updates, macOS upgrades, or moving the host directory; re-priming takes the same few steps. If you would rather avoid this entirely, skip section 3.4 and stay on UTM's UI-configured share — you will still get correct permissions inside the VM, only the host-side mode bits will read as 0600.
If renumbering the guest user is not appropriate — for instance, you share the VM image across machines where the host UIDs differ, or you cannot disturb existing files owned by UID 1000 — you can leave the guest user at its default IDs and use the alternatives below instead.
The bindfs filesystem creates a second mount on top of the 9p one with ownership remapped to your guest user. The underlying files and their host-side ownership are untouched.
sudo apt install bindfs
$ id -u   # expect 1000
$ id -g   # expect 1000
$ ls -na /mnt/utm1
drwxr-xr-x  501  20  4096  ...
Note the numbers on each side — 501 and 20 on the host, 1000 and 1000 in the guest.
Create a directory where the remapped view will appear:
mkdir ~/src
Add a second line to /etc/fstab:
# bindfs: remap macOS UID/GID to Linux UID/GID
/mnt/utm1  /home/username/src  fuse.bindfs  map=501/1000:@20/@1000,x-systemd.requires=/mnt/utm1,_netdev,nofail,auto  0 0
The key options:
Apply and mount:
sudo systemctl daemon-reload
sudo mount ~/src
Now ~/src shows your files with the guest user's IDs:
$ ls -na ~/src
drwxr-xr-x  1000  1000  4096  ...
Bindfs does not affect host-side mode bits: under UTM's default mapped-xattr the host files remain 0600. To change that, combine bindfs with a raw-args share using security_model=none as in section 3.4 — and mind the bookmark caveat in section 3.5.
UTM's UI supports only one shared directory per VM. But it can be useful to have multiple shared directories, e.g., to have more fine-grained isolation rather than exposing an entire directory tree to the VM.
To share more than one directory, the simplest option is to export the second directory over NFS from the Mac. If NFS's higher latency becomes a bottleneck, you can add another 9p share via custom QEMU arguments instead, at the cost of the macOS sandbox priming dance from section 3.5.
The examples below share a second host directory /Users/username/shared and mount it at ~/shared on the guest.
NFS is served by nfsd on the macOS host. The guest kernel talks to it over the virtual network, so QEMU never opens the files and UTM's sandbox is not involved.
Add one line to /etc/exports for each directory you want to share:
/Users/username/shared -network 192.168.64.0 -mask 255.255.255.0 -mapall=username
The -network/-mask clause restricts access to UTM's shared-network subnet. Confirm the actual subnet with ifconfig — UTM uses bridge10x interfaces that appear only while a VM is running. -mapall=username squashes every incoming request to your Mac user, so writes from the guest land on the host as your macOS user regardless of the guest's internal UID.
Enable nfsd (which also makes it start at every boot), start it, and re-read the exports on each change:
sudo nfsd enable
sudo nfsd start
sudo nfsd update
Note that macOS's nfsd serves only NFSv2 and NFSv3; NFSv4 is not supported on the server side. The guest side must therefore mount with vers=3 explicitly, since modern Linux defaults to v4.
Install NFS client support and create the mount points:
sudo apt install nfs-common
sudo mkdir -p /mnt/nfs1
mkdir ~/shared
Add two /etc/fstab lines — one for the NFS mount and one for the bindfs remap on top of it (same UID/GID fix as for the 9p share):
192.168.64.1:/Users/username/shared  /mnt/nfs1  nfs  vers=3,proto=tcp,rsize=65536,wsize=65536,_netdev,nofail,auto  0 0
/mnt/nfs1  /home/username/shared  fuse.bindfs  map=501/1000:@20/@1000,x-systemd.requires=/mnt/nfs1,_netdev,nofail,auto  0 0
Replace 192.168.64.1 with the Mac's IP on the UTM vmnet (usually the .1 of the subnet). Then:
sudo systemctl daemon-reload
sudo mount /mnt/nfs1
sudo mount ~/shared
The -network clause in /etc/exports is nfsd's own access control and is the primary defense against non-VM clients. The macOS Application Firewall (System Settings > Network > Firewall), even when enabled, does not restrict nfsd by subnet — it makes per-application decisions, and nfsd is an Apple-signed daemon that it allows by default. For a dev-machine threat model, the exports restriction alone is usually sufficient.
For defense in depth, or if you sometimes work on untrusted networks, you can add pf rules that block NFS (TCP/UDP 2049) and portmap (TCP/UDP 111) at the packet layer except from the UTM subnet. Create /etc/pf.anchors/com.nfs-restrict:
block in quick proto { tcp, udp } from any to any port { 2049, 111 }
pass  in quick proto { tcp, udp } from 192.168.64.0/24 to any port { 2049, 111 }
And load it from /etc/pf.conf.
NFS has noticeably higher per-operation latency than 9p, which shows up in metadata-heavy workloads (git on a large tree, build systems that stat() thousands of files). If this bottlenecks your workflow, either build into a VM-local directory (e.g., set CARGO_TARGET_DIR, GOCACHE, or a CMake out-of-tree build dir), or switch to Option 2.
If NFS latency is a problem even with VM-local build artifacts, the alternative is a second 9p share added via raw QEMU arguments. Performance matches the original 9p share, but you have to deal with the macOS sandbox — see section 3.5 for the priming workaround.
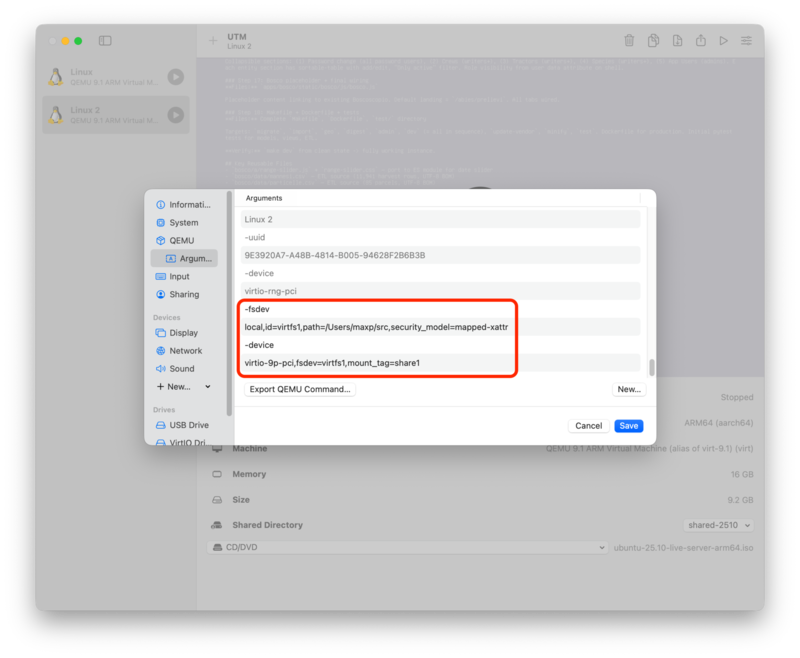
Shares are passed to QEMU as pairs of -fsdev/-device arguments. You can add more of these yourself: in the VM settings, open the QEMU > Arguments page and click "New..." for each entry. For a second share pointing at /Users/username/shared, add the four arguments:
-fsdev
local,id=virtfs1,path=/Users/username/shared,security_model=mapped-xattr
-device
virtio-9p-pci,fsdev=virtfs1,mount_tag=share1
The id (virtfs1) and mount_tag (share1) must both differ from those used by the UI-configured share (typically virtfs0 and share). Screenshots of UTM's Arguments pane, before and after adding the extra share:
In the guest, set up the new mount points:
sudo mkdir -p /mnt/utm2
mkdir ~/shared
And add two /etc/fstab lines, using the new mount_tag (share1) as the 9p source:
share1  /mnt/utm2  9p  trans=virtio,version=9p2000.L,rw,_netdev,nofail,auto  0 0
/mnt/utm2  /home/username/shared  fuse.bindfs  map=501/1000:@20/@1000,x-systemd.requires=/mnt/utm2,_netdev,nofail,auto  0 0
(If you renumbered the guest user as in section 3, drop the bindfs line and use /mnt/utm2 directly. You can also switch security_model from mapped-xattr to none — same trade-offs as in section 3.4.)
Either way, prime the security-scoped bookmark for the new path as in section 3.5 before starting the VM, or the new fsdev will fail to open.
UTM's VM display window is serviceable for initial bringup, but for day-to-day use it is much nicer to SSH into the VM from a Mac terminal — you get copy/paste, scrollback, your usual shell setup, and tabs. This is especially useful for running Claude Code.
sudo apt install openssh-server
sudo systemctl enable --now ssh
Find the VM's IP on the shared-network interface:
ip addr show
Look for an address on the UTM subnet (typically 192.168.64.x).
Give the VM a convenient name by editing /etc/hosts on the Mac and adding a line like:
192.168.64.5 claude-vm
(Of course, replace the IP with the one from the step above, and the hostname with whatever you want.) UTM's shared-network DHCP assigns stable leases based on the VM's MAC, so the IP should remain valid unless you replace the virtual NIC.
If you do not already have an SSH key on the Mac, generate one:
ssh-keygen -t ed25519
Copy the public key to the VM:
ssh-copy-id username@claude-vm
You should now be able to log in without a password:
ssh claude-vm
Claude Code requires Node.js 18 or later. Install it (and NPM, if necessary) in the VM:
sudo apt install nodejs npm
Then install Claude Code:
npm install -g @anthropic-ai/claude-code
You can now cd into ~/src (or any subdirectory of it) and run claude. It will operate on your shared files within the safety of the VM.